There’s something incredibly special about paper art, isn’t there? Whether it’s intricate origami, delicate quilling, or stunning paper sculptures, these pieces deserve to be shown off in their best light.

I’ve personally spent countless hours perfecting my own paper creations, and I know the joy – and sometimes the frustration – of figuring out just the right way to display them so they truly pop.
Forget simply sticking them on a shelf; we’re talking about elevating your art into a statement piece that captivates every eye. In today’s creative landscape, displaying your paper art isn’t just about protection; it’s about storytelling and creating an experience.
I’ve noticed a huge shift towards innovative, eco-friendly framing solutions and even incorporating subtle lighting to highlight every fold and cut, making your handmade treasures feel truly bespoke and professional.
Think beyond the basic frame; we’re exploring everything from minimalist floating displays that make your pieces appear to defy gravity, to dynamic, shadow-casting arrangements that add another dimension to your work.
This isn’t just about presentation; it’s about ensuring your hard work gets the spotlight it deserves and makes a lasting impression. Let’s dive into the details below to ensure your beautiful paper art truly shines!
Illuminating Your Masterpieces: A Glow-Up for Your Paper Art
There’s an undeniable magic that happens when light interacts with paper art. I’ve personally experimented with countless lighting setups, from simple desk lamps to sophisticated gallery track lights, and I can tell you, the difference it makes is absolutely astonishing.
It’s like your paper creation suddenly wakes up, revealing hidden textures, subtle folds, and intricate details you might not have even noticed before.
For me, the goal is always to create a captivating interplay of light and shadow that makes the artwork feel alive, drawing the viewer in for a closer look and truly enhancing their appreciation for the craftsmanship.
You want to avoid harsh glares that flatten your beautiful work, and instead, aim for a soft, directional glow that highlights its three-dimensionality.
This isn’t just about making it visible; it’s about making it unforgettable. When I first started displaying my quilled pieces, I just relied on ambient room light, and they looked… fine.
But once I introduced a subtle spotlight, the depth and color just exploded, and I realized I’d been doing my art a disservice all along. It’s a game-changer, trust me.
Think about how museums light their prize possessions; we can bring a piece of that professional touch into our own homes or galleries without needing a huge budget.
The right lighting can transform a simple piece into a dramatic focal point.
Strategic Spotlighting: Highlighting Every Fold
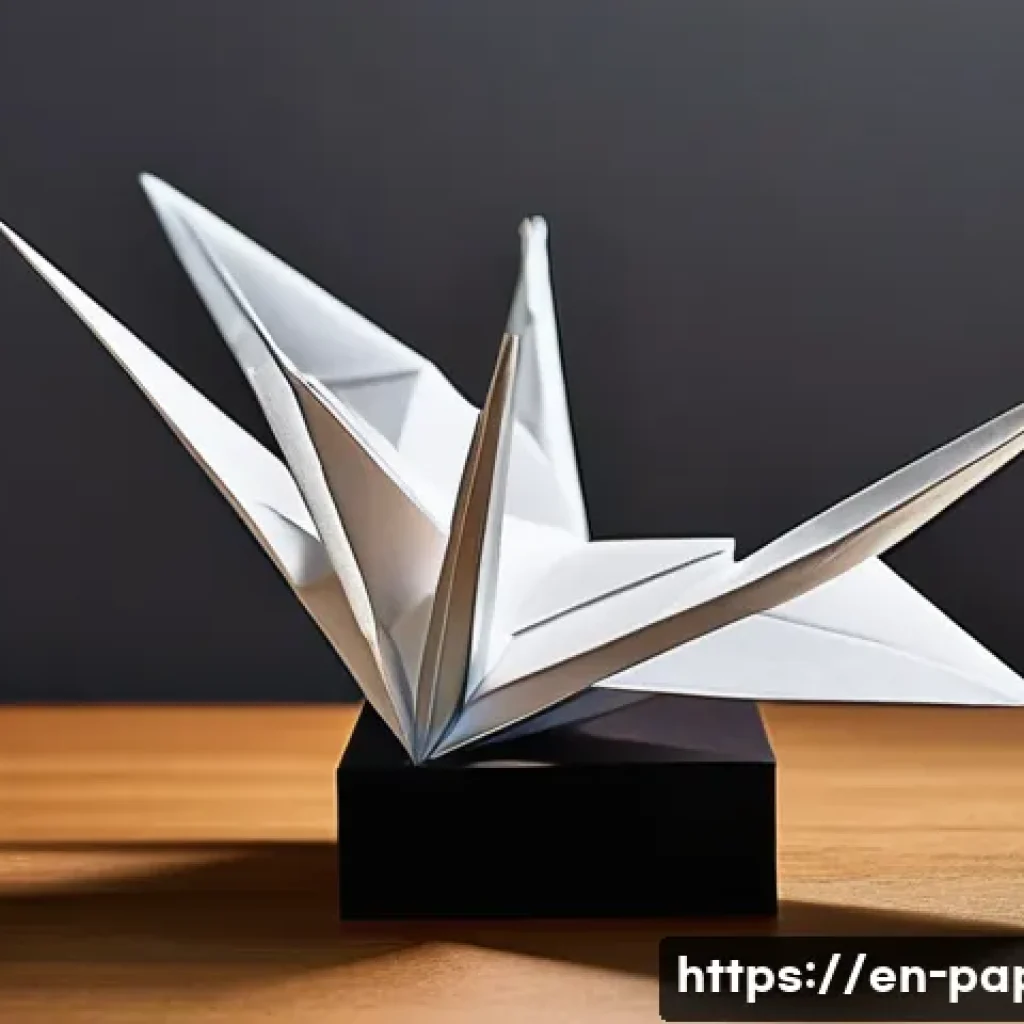
When it comes to paper art, precision lighting is your best friend. I’ve found that small, adjustable LED spotlights work wonders. The key is to position them carefully, often slightly above and to the side of your artwork, so they cast gentle shadows that emphasize relief and texture.
This method is particularly effective for origami or paper sculpture where form is paramount. Imagine a beautifully folded crane; with light coming from one direction, each crease and curve becomes more pronounced, giving the piece a sculptural quality that flat ambient light simply can’t achieve.
I remember once I had a very delicate cut-paper piece, and the way the light hit it just right, it looked like it was floating. It wasn’t just about seeing the art; it was about feeling its presence.
Battery-operated options are fantastic for temporary displays or if you’re like me and constantly rearranging your art to find the perfect spot without worrying about outlets and cords.
This kind of focused illumination truly makes your work pop and keeps eyes on it for longer, which is exactly what we want, isn’t it?
Ambient Glow and Backlighting: Creating Mood and Depth
Beyond direct spotlights, incorporating ambient lighting or even backlighting can dramatically alter the mood and perception of your paper art. For flat pieces, especially intricate cut-paper designs, subtle backlighting can create a breathtaking silhouette effect, making the details stand out against a soft glow.
I’ve seen some artists use thin LED strips hidden behind their framed pieces, and the result is just mesmerizing. It adds a magical, almost ethereal quality.
For larger installations or display shelves, soft LED strip lights or even fairy lights can introduce a warm, inviting glow that makes the entire area feel cozy and draws attention to your collection as a whole.
It’s about creating an atmosphere where your art feels at home. This isn’t just about visibility; it’s about crafting an experience. Think about how a cozy cafe uses lighting to make you want to stay a while; we’re applying that same principle to our art displays to encourage longer viewing and deeper appreciation.
Framing Finesse: Elevating Simplicity to Sophistication
Oh, the joy of finding the perfect frame! It’s not just a protective barrier; it’s an extension of your artwork, a border that guides the eye and elevates the piece from “craft project” to “fine art.” I’ve spent countless hours in frame shops, sometimes agonizing over the slightest shade difference in a mat board, but I can tell you, that attention to detail pays off.
A well-chosen frame enhances the art’s colors, protects it from dust and environmental damage, and importantly, integrates it seamlessly into your home decor.
Forget those cheap, generic frames; your precious paper art deserves better. We’re talking about frames that act as a silent narrator, whispering tales of craftsmanship and care.
I learned early on that a bad frame can actually detract from even the most stunning piece, making it look cheap or out of place. Conversely, a thoughtfully selected frame, even a simple one, can transform an everyday paper creation into a gallery-worthy display.
It’s about respecting the art you’ve poured your heart into.
Choosing the Right Encasement: Glass, Acrylic, and Beyond
When you’re framing paper art, the choice of glazing – whether it’s glass or acrylic – is more important than you might think. For me, UV-protective glass is often worth the investment, especially if your art is going to be in a brightly lit room.
Paper, as we know, can be susceptible to fading, and protecting it from harmful UV rays is crucial for its longevity. However, for larger pieces or those displayed in high-traffic areas, acrylic (or Plexiglas) is a fantastic lightweight and shatter-resistant alternative.
I’ve used acrylic for some of my more delicate, larger pieces, and it offers peace of mind without compromising clarity. The trick is to ensure there’s enough space between the art and the glazing.
This is where a good mat board comes in, or if you’re going for a shadowbox effect, spacers. You absolutely don’t want your paper art pressing directly against the glass, as it can lead to damage and condensation issues over time.
Matting Magic: Defining Space and Enhancing Detail
Matting is an art form in itself, and it plays a critical role in how your paper art is perceived. A well-chosen mat does several things: it creates visual breathing room around your artwork, preventing it from looking cramped, and it can also draw the eye inward towards the focal point.
I often opt for acid-free, archival quality mat boards to ensure no discoloration over time. Color-wise, a neutral white, off-white, or a subtle shade pulled from a minor color in your artwork usually works best.
Sometimes, a double mat, with a very thin inner mat in a contrasting color, can add a layer of sophistication and depth. I once matted a vibrant origami piece with a stark white outer mat and a thin, rich navy inner mat, and it truly made the colors pop in a way I hadn’t anticipated.
It’s all about creating that perfect visual harmony and making your paper art feel truly intentional and professionally presented.
Beyond the Wall: Creative Space Solutions for 3D Paper Art
Let’s be real, not all paper art is destined for a frame on a wall. Some of our most exciting creations – think intricate sculptures, delicate dioramas, or complex pop-up books – demand a more dynamic display.
And honestly, this is where my creativity really starts to buzz! I’ve experimented with everything from clear acrylic cases to custom-built shelves, always looking for ways to showcase those three-dimensional masterpieces without diminishing their impact.
The beauty of 3D paper art is its ability to interact with space, to cast intriguing shadows, and to invite viewers to walk around it, exploring every angle.
Simply sticking these pieces on a flat shelf can sometimes make them lose their magic, flatten their personality, and hide their exquisite depth. The trick is to give them room to breathe and to encourage interaction, even if it’s just visual.
It’s about turning your art into a focal point, a conversation starter, something that truly commands attention in any room.
Pedestals and Platforms: Giving Your Sculptures a Stage
For freestanding paper sculptures, pedestals or platforms are an absolute must. They elevate your artwork, literally and figuratively, giving it the prominence it deserves.
I’ve found that varying the heights of pedestals for a series of pieces can create a much more engaging display than simply lining them up. Think about materials too: a sleek acrylic pedestal can give a modern, minimalist feel, while a wooden one can add warmth and an organic touch.
I once displayed a series of paper flower sculptures on small, unfinished wooden blocks, and the natural texture of the wood beautifully complemented the delicate nature of the paper.
It’s about creating a little stage for your art, drawing the eye up and allowing the viewer to appreciate the piece from all angles. This approach works wonderfully for installations in open spaces, ensuring your painstaking 3D efforts are seen and appreciated.
Shadow Boxes and Domes: Preserving and Presenting Delicate Works
For fragile 3D paper art, such as delicate quilled pieces or intricate miniature scenes, shadow boxes or clear acrylic domes are perfect. They offer vital protection from dust, curious fingers, and even slight breezes, while still allowing for a full view of the artwork.
I adore shadow boxes because they create a mini-environment for your art. You can add a subtle background color or texture, or even incorporate small LED lights inside to illuminate specific details.
I recently housed a detailed paper diorama in a deep shadow box, and by adding a tiny string of fairy lights around the perimeter, it transformed into a magical little world, sparkling with life.
Acrylic domes are fantastic for sculptural pieces that you want to be admired from every angle, providing 360-degree visibility while keeping them safe.
They maintain that pristine condition, ensuring your intricate work lasts for years.
Curating Your Collection: Storytelling Through Grouped Displays
There’s something incredibly satisfying about arranging a collection of paper art in a way that tells a story, creates a mood, or highlights a theme. Simply scattering individual pieces around a room can make them feel disjointed, but bringing them together in a thoughtful grouping can amplify their impact exponentially.
I’ve spent countless evenings rearranging pieces on my walls and shelves, playing with different layouts until that “aha!” moment hits and everything just clicks.
It’s like being a curator in your own home, transforming a mere assortment of artworks into a cohesive narrative. This strategy isn’t just about aesthetics; it’s about engaging the viewer on a deeper level, inviting them to discover connections between pieces and to appreciate the breadth of your creative journey or collection.
It helps reduce visual clutter and makes each piece feel more significant within the larger context.
Gallery Walls: Creating a Visual Symphony
Gallery walls are my absolute favorite for showcasing multiple framed paper art pieces. The trick is to treat the wall itself as a canvas. You can go for a perfectly symmetrical grid for a clean, modern look, or a more eclectic, organic arrangement that feels wonderfully personal and lived-in.
I often mix different frame styles and sizes, but I try to keep a consistent color palette or a unifying element – perhaps all pieces feature a touch of blue, or they are all abstract designs.
Before I hang anything, I lay out all the framed pieces on the floor to visualize the arrangement. This saves so much frustration and avoids unnecessary nail holes!
The goal is to create a dynamic visual journey for the eye, where each piece contributes to a larger, more impactful statement. It’s a fantastic way to display a progression of your work or a collection around a particular theme or artist.
Thematic Groupings: Crafting Cohesive Narratives
Beyond gallery walls, creating thematic groupings on shelves, mantelpieces, or in display cabinets can bring your collection to life. For example, if you have several paper flowers, group them together in an elegant vase or under a cloche.
If your work explores different textures, arrange pieces with similar tactile qualities together. I once created a small display with several monochrome origami pieces, all in shades of grey and black, placed on different levels of a minimalist shelf.

The simplicity and unity of the theme made a powerful statement, much more so than if they were scattered. This approach helps the viewer understand the “why” behind your art, guiding their interpretation and deepening their appreciation.
It’s about making deliberate choices that enhance the collective impact of your individual works.
Preservation Prowess: Keeping Your Paper Art Pristine
As a paper artist, I’ve learned the hard way that our beautiful creations, while resilient in their own way, are also incredibly delicate and susceptible to the whims of their environment.
There’s nothing more heartbreaking than seeing a treasured piece fade, warp, or become damaged over time. So, beyond just making them look good, protecting your paper art is paramount.
Think of yourself not just as an artist, but as a guardian of your work. We invest so much time, passion, and skill into each fold, cut, or curl, and ensuring that investment lasts for years to come is a critical part of the display process.
It’s not just about aesthetics; it’s about ensuring longevity, so future generations (or just your future self!) can continue to enjoy the beauty you’ve created.
Environmental Vigilance: The Enemies of Paper Art
The biggest threats to paper art are often invisible: light, humidity, and temperature fluctuations. I always advise avoiding direct sunlight for any paper artwork, even if it’s behind UV-protective glass.
Harsh, prolonged exposure will inevitably lead to fading and embrittlement. Humidity is another silent killer; too much can cause paper to warp, buckle, or even encourage mold growth.
Conversely, overly dry conditions can make paper brittle and prone to cracking. I personally try to keep my display areas at a consistent room temperature and humidity level, usually around 68-72°F (20-22°C) and 40-50% relative humidity.
If you live in an area with extreme fluctuations, a small hygrometer can be your best friend, helping you monitor the conditions. Dust is also an issue, of course, which is why enclosed displays like frames or shadow boxes are so beneficial.
Handling with Care: Protecting from Physical Damage
It might seem obvious, but proper handling is crucial. Always, and I mean *always*, handle paper art with clean, dry hands. Even better, wear cotton gloves to prevent transferring oils and dirt from your skin.
When moving framed pieces, grasp them firmly by the frame, not by the artwork itself. For unframed or delicate 3D pieces, support them from the base and avoid touching any intricate details directly.
If you need to clean a framed piece, use a soft, dry microfiber cloth for the glass or acrylic. For dust on exposed paper art, a very soft, clean brush (like a cosmetic brush) can gently sweep away particles, but be incredibly careful not to snag or tear the paper.
It’s about treating your creations with the respect they deserve, ensuring they remain immaculate for as long as possible.
| Display Method | Best For | Key Benefits | Considerations |
|---|---|---|---|
| Framed & Matted | Flat works (quilling, cut-paper, origami tessellations) | Protection from dust/UV, professional look, easy wall mounting | Cost of framing, glass glare, weight |
| Shadow Box | Low-relief 3D pieces, small dioramas, layered art | Depth perception, enhanced protection, versatile backgrounds | Can be bulky, heavier than standard frames |
| Acrylic Case/Dome | Freestanding 3D sculptures, intricate models | 360-degree viewing, excellent dust protection, modern aesthetic | Cost, potential for static cling, size limitations |
| Pedestal/Platform | Larger 3D sculptures, art meant for open spaces | Elevates artwork, creates focal point, encourages viewing from all angles | Requires sturdy base, can be tripped over in high-traffic areas |
| Wall-Mounted Shelves | Mixed media paper art, grouped collections, lightweight sculptures | Flexible arrangement, adds dimension to walls, cost-effective | Dust accumulation, less protection, risk of falling if not secured |
Tech-Savvy Showcases: Incorporating Digital Enhancements
In our increasingly digital world, why should paper art stay strictly analog in its display? I’ve been fascinated by how technology can be subtly integrated to enhance the viewing experience, bringing a fresh, modern twist to traditional craftsmanship.
We’re not talking about replacing the tactile beauty of paper, but rather complementing it, adding layers of engagement that weren’t previously possible.
Imagine a piece that subtly shifts under changing light patterns, or a framed artwork that can tell you its story with a simple scan. This fusion of old and new really sparks my creativity and offers exciting new avenues for making your paper art stand out in a crowded digital landscape.
It’s about pushing boundaries and exploring how to make your art even more captivating for today’s audience.
Augmented Reality (AR) Experiences: Bringing Art to Life
One of the coolest developments I’ve played with is using augmented reality to add another dimension to paper art. Imagine you have a beautifully intricate paper sculpture, and with a simple scan of your phone over it, an AR overlay pops up showing the creation process, an animation related to its theme, or even an audio narration by the artist (that’s you!).
It creates an interactive, immersive experience that deepens the viewer’s connection to the piece. I’ve seen artists use free apps to create these kinds of experiences, linking a QR code or a specific image to digital content.
It’s not just a static display anymore; it becomes a portal to more information, a story waiting to be uncovered. This technology is incredibly accessible now, and it’s a brilliant way to make your art feel cutting-edge and memorable, encouraging people to spend more time engaging with your work.
Smart Lighting Systems: Dynamic Ambiance at Your Fingertips
Beyond basic spotlights, smart lighting systems offer incredible control and dynamic possibilities for displaying paper art. I’m talking about lights you can control with your phone, changing colors, intensity, and even creating automated schedules.
Imagine setting a subtle color gradient that shifts throughout the day, mirroring the natural light, or a dramatic spotlight that activates only when someone approaches the artwork.
Philips Hue and similar systems allow for precise adjustments, letting you experiment with how different light temperatures and hues affect the perception of your paper.
For example, a cool blue light might emphasize the intricate folds of an origami piece, while a warm amber glow could highlight the delicate texture of a paper flower.
This level of customization allows you to create truly unique and responsive display environments that can be tweaked on a whim to perfectly match the mood or the piece.
Budget-Friendly Brilliance: Smart Display Solutions That Won’t Break the Bank
Let’s be honest, while custom framing and smart lighting are fantastic, they can sometimes come with a hefty price tag. But here’s the good news: you absolutely don’t need to spend a fortune to display your paper art beautifully and effectively.
As someone who’s always on the lookout for clever hacks and affordable solutions, I’ve discovered a ton of ways to make your pieces shine without emptying your wallet.
It’s all about resourcefulness, a little bit of DIY spirit, and thinking outside the traditional “frame.” The goal is to maximize impact and protection using readily available or upcycled materials, proving that great display isn’t just for those with deep pockets.
I’ve always believed that creativity extends beyond the artwork itself, into how it’s presented, and sometimes, the most ingenious solutions are the ones that cost the least.
Clever Repurposing: Giving New Life to Old Objects
One of my favorite budget-friendly strategies is repurposing everyday items into unique display pieces. Old picture frames can be repainted or stripped for a new look.
Clear glass jars, cloches, or even inexpensive cake stands can become stunning dust-proof displays for smaller 3D sculptures. I once used a vintage wooden cigar box, lined with velvet, to display a tiny, intricate paper diorama, and it looked incredibly chic and bespoke.
Thrift stores, garage sales, and even dollar stores are treasure troves for these kinds of items. Think outside the box: an old book stand can become an easel for a pop-up book, or a beautiful ceramic plate can serve as a base for a paper flower arrangement.
It’s about seeing potential where others might just see junk, and transforming it into something that complements your art perfectly.
DIY Mounting and Framing: Crafting on a Dime
For those of us who love a good DIY project, creating your own mounting solutions or even simple frames can be incredibly rewarding and cost-effective.
For flat pieces, you can get archival mat board sheets and cut your own mats to fit standard-sized, affordable frames from craft stores. Magnetic poster hangers offer a minimalist, modern look and are super easy to swap out artwork.
For lightweight 3D pieces, consider creating floating displays using clear fishing line attached to a small adhesive hook on the ceiling or inside a shelf.
I’ve even seen artists use inexpensive acrylic sheets and stand-offs to create a contemporary floating frame effect for very little cost. There are countless tutorials online for building simple shadow boxes or pedestals from foam core or even sturdy cardboard, which you can then paint or cover to match your aesthetic.
It’s all about getting hands-on and tailoring the display to your specific needs and budget.
Wrapping Things Up
And there you have it, my friends! We’ve journeyed through the enchanting world of showcasing paper art, from the subtle dance of light and shadow to the grand statement of a thoughtfully curated collection. My hope is that this deep dive has sparked some fresh ideas and given you the confidence to truly make your paper masterpieces shine. Remember, your art isn’t truly complete until it’s presented in a way that respects the love and effort you poured into it. It’s about creating an experience, telling a story, and inviting others to fall in love with the intricate beauty you’ve brought to life. Don’t be afraid to experiment, to break a few rules, and to let your personality infuse every aspect of your display. After all, your unique touch is what makes your art, and its presentation, truly unforgettable.
Useful Information to Know
1. Prioritize Protection: Always, always, always think about how to protect your delicate paper art from dust, UV light, and humidity. Investing in UV-protective glass or acrylic, and maintaining stable room conditions, will extend the life of your precious creations significantly.
2. Experiment with Lighting: Don’t settle for ambient room light! Play around with adjustable LED spotlights, subtle backlighting, or even smart lighting systems to reveal textures, create depth, and set the perfect mood for your artwork. A little light goes a long way.
3. Frame Thoughtfully: A frame isn’t just a border; it’s an integral part of your artwork’s presentation. Choose frames and mats that complement the piece, give it breathing room, and elevate its perceived value. Archival materials are always a smart choice.
4. Embrace 3D Display Solutions: For sculptures and intricate forms, think beyond flat walls. Pedestals, shadow boxes, and clear acrylic domes offer wonderful ways to showcase three-dimensional works, allowing viewers to appreciate them from every angle while keeping them safe.
5. Curate with Intention: Grouping your art thematically or creating a gallery wall isn’t just about filling space; it’s about storytelling. Arrange your pieces to create a cohesive narrative or a striking visual impact, guiding the viewer’s eye and enhancing their engagement.
Key Takeaways
Presenting your paper art goes far beyond simply hanging it on a wall; it’s an art form in itself. By strategically using light, choosing appropriate framing and display solutions, and thoughtfully curating your collection, you can dramatically enhance the impact and longevity of your creations. Remember, your personal touch and attention to detail in presentation are just as important as the artistry itself, transforming your pieces from mere objects into captivating experiences that resonate deeply with anyone who sees them. Treat your paper art with the reverence it deserves, and it will continue to bring joy and wonder for years to come.
Frequently Asked Questions (FAQ) 📖
Q: What’s the best way to protect my intricate paper art from dust and potential damage while still letting its details shine?
A: Oh, this is such a common dilemma, and one I’ve wrestled with countless times in my own creative journey! There’s nothing more heartbreaking than seeing your painstaking work gather dust or, worse, get accidentally bent.
From my experience, the golden rule is thoughtful enclosure. Forget just leaving pieces exposed on a shelf. For truly delicate items, a shadow box frame is an absolute game-changer.
They offer that crucial depth, so your origami cranes or quilled mandalas aren’t flattened against glass. I always look for frames with museum-quality, UV-protective acrylic or glass.
It’s an extra investment, sure, but it acts like sunscreen for your art, preventing those vibrant colors from fading over time, which is a real bummer.
Another little secret? Using acid-free backing boards and mats. This might sound overly scientific, but trust me, regular cardboard can actually yellow and damage your paper over the years.
By taking these simple steps, you’re not just displaying your art; you’re preserving your hard work for years of enjoyment, and that’s a win-win in my book!
Q: I want my paper art to be a real conversation starter, not just another piece on the wall. How can I display it in a truly unique and modern way?
A: You are speaking my language! I completely get that desire to elevate your paper art from ‘craft’ to ‘captivating display.’ I’ve personally experimented with so many different setups, and the key is to think outside the traditional box.
One of my absolute favorite modern trends is the ‘floating display.’ Instead of a heavy frame, imagine mounting your paper piece onto a clear acrylic panel or even a white board that’s slightly smaller than your art, then using standoffs to lift it away from the wall.
This creates a gorgeous shadow effect that changes with the light, adding incredible depth and dynamism to your piece. It literally looks like your art is defying gravity!
Another fantastic idea, especially for installations with multiple pieces, is to incorporate subtle LED strip lighting. Placed strategically, it can highlight every delicate fold and cut, creating a truly dramatic and professional gallery feel right in your home.
I even saw someone use a very thin fishing line to hang a flock of origami birds from their ceiling at varying heights, illuminated by a single spotlight – absolutely breathtaking and a definite conversation starter!
It’s all about creating an experience.
Q: Displaying art can get expensive, but I’m on a budget. What are some affordable yet impactful ways to showcase my paper art professionally?
A: I hear you loud and clear on the budget front! It’s a common misconception that professional displays require deep pockets. I’ve learned through trial and error that some of the most stunning presentations come from creativity, not cost.
One of my go-to budget-friendly solutions is repurposing. Have an old, plain picture frame lying around? Give it a fresh coat of spray paint in a bold color or a clean matte white.
Then, instead of just dropping your art in, consider mounting your paper piece on a contrasting, slightly larger piece of cardstock. This creates an instant “matting” effect that looks far more expensive than it is.
Another fantastic option, especially for smaller, delicate pieces like quilled jewelry or tiny origami, is a glass cloche or bell jar. You can often find these at thrift stores or discount home goods shops for a steal!
They instantly elevate your art, providing a dust-free, sophisticated display. And for a truly unique and almost free option, why not create a “gallery wall” using binder clips and string?
Simply hang a string across an empty wall space, and use small, colorful binder clips to attach your paper art. It’s minimalist, modern, and incredibly impactful, proving you don’t need a huge investment to make your paper art shine!