Hey crafters! If you’re anything like me, you’ve probably rediscovered the sheer joy and quiet satisfaction of bringing paper to life. It’s more than just cutting and folding; it’s a mindful escape, a burst of creative energy, and honestly, a fantastic way to disconnect from screens for a bit.

I’ve personally found that diving into a new paper project is the perfect way to unwind after a busy week, and the feeling of holding something beautiful that I’ve made with my own hands?
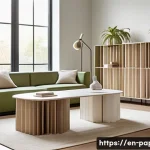
Absolutely priceless. We’re seeing paper art pop up everywhere these days, from stunning home décor trends to personalized, eco-friendly gifts, and even clever ways to keep the kids entertained without a tablet in sight.
It’s no longer just a hobby; it’s a movement, constantly evolving with fresh techniques and surprising materials. Whether you’re a seasoned pro looking for new inspiration or just starting out and feeling a little overwhelmed by all the possibilities, you’re in for a treat.
I’m excited to share some of my absolute favorite insider tips and tricks that I’ve picked up over the years, all designed to elevate your creations and make your paper crafting journey even more rewarding.
Let’s unlock the full potential of your paper crafting together.
Unlocking Your Creative Arsenal: Essential Tools and Materials
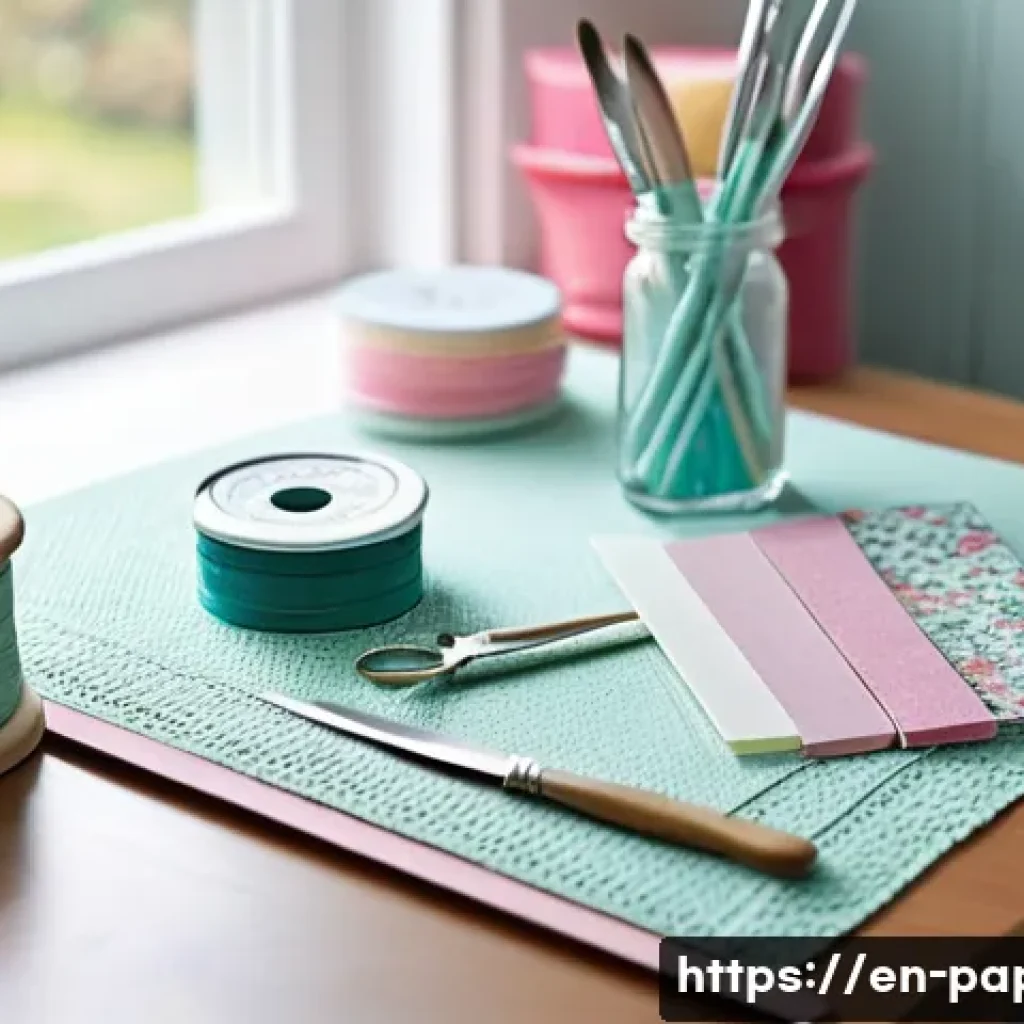
Okay, let’s talk shop! When I first started my paper crafting journey, I honestly thought all I needed was a pair of scissors and some construction paper. Boy, was I wrong! While you *can* start simple, having the right tools and knowing a bit about your materials can absolutely transform your projects from “nice” to “wow.” Think of it like a chef with their knives; a good set makes all the difference. I’ve personally invested in a few key pieces over the years, and they’ve truly paid for themselves in the sheer joy and quality of my creations. It’s not about having *everything*, but about having the *right things* for the projects you love. Trust me, a sharp craft knife will save you so much frustration compared to trying to cut intricate designs with dull old scissors. And don’t even get me started on a good self-healing mat – a true tabletop savior!
Investing Smartly: Tools That Last
When it comes to tools, I’ve always believed in quality over quantity. You don’t need to break the bank, but a few well-chosen items will make your crafting so much more enjoyable and your results far more professional. My absolute go-to items include a self-healing cutting mat (it saves your work surface and keeps your blades sharp longer!), a precision craft knife with a good supply of replacement blades, and a reliable metal ruler. For intricate work, a detail scissors set is a game-changer. And if you’re getting into anything beyond flat cards, a scoring board is a must-have for crisp, clean folds – it’s a revelation! I remember trying to score paper with the back of a butter knife when I first started, and the difference a proper scoring tool makes is just incredible. It reduces tearing and gives your folded projects a truly finished look. Another small but mighty tool I swear by is a good pair of tweezers for handling tiny embellishments or fiddly paper pieces. It’s those little things that truly elevate the experience.
Paper Perfect: Choosing Your Canvas Wisely
Ah, paper – the star of our show! It might seem like just paper, but there’s a whole world out there beyond basic copy paper. Different projects call for different weights, textures, and finishes. For cardmaking, I absolutely adore cardstock with a weight of 80lb to 110lb; it feels substantial and holds up beautifully. For delicate cutouts or intricate quilling, lighter text-weight paper or specialty origami paper is perfect. When I’m working on something I want to last, like a decorative box or a scrapbook page, I always opt for acid-free paper to prevent yellowing over time. Don’t be afraid to experiment with patterned papers, vellum for a translucent effect, or even handmade papers for a unique touch. I once tried making a paper sculpture with some beautiful linen-textured paper, and the way it caught the light was just stunning. It’s amazing how much the choice of paper can influence the final look and feel of your creation. Just keep an eye out for sales at your local craft store, or online; you can often find fantastic deals on bundles of various papers to build up your stash without spending a fortune.
Beyond the Cut: Mastering Fundamental Techniques
Once you’ve got your tools sorted, it’s time to talk technique. Paper crafting isn’t just about cutting things out; it’s an art form that involves a surprising amount of precision and a bit of finesse. The difference between a project that looks handmade (in a charming way) and one that looks truly professional often comes down to these fundamental skills. I’ve learned over the years that taking an extra moment to measure twice, score properly, or apply adhesive just so, can save a lot of heartache and wasted materials. It’s like baking; you can’t just throw ingredients together and expect a perfect cake. There’s a method to the madness, and once you get these basics down, your creative possibilities will just explode! I remember my early attempts at folding boxes, and they were, shall we say, “rustic.” But with a bit of practice and understanding the mechanics of a good fold, my boxes now look like they came straight from a boutique.
Precision is Key: Achieving Clean Lines and Folds
Nothing screams “amateur” like crooked cuts and uneven folds, and believe me, I’ve been there! The secret to clean lines starts with your cutting mat and ruler. Always use a metal ruler with your craft knife, not a plastic one, as the blade can easily slip and damage plastic. When cutting, make several light passes rather than one deep cut; this gives you more control and results in a cleaner edge. For folds, a scoring board is your best friend. Score your paper *before* folding, on the side you want the crease to be. This compresses the paper fibers, allowing for a crisp, professional fold. I also swear by a bone folder to really burnish those creases down – it gives your projects a polished, finished look that makes all the difference. When I first started using a bone folder, I was amazed at how much more professional my cards and boxes looked. It’s a small step that makes a huge visual impact.
The Sticky Business: Adhesives Demystified
Choosing the right adhesive is crucial and honestly, it can be a bit overwhelming with all the options out there. For general paper crafting, a good quality liquid craft glue that dries clear and strong is a staple. My personal favorite is a fast-drying PVA glue, but I always make sure it’s acid-free. For intricate details, a fine-tip glue applicator can be a lifesaver. Double-sided tape is fantastic for quick, mess-free applications, especially when you need a flat, even bond. For dimensional effects, foam dots or squares are amazing; they lift elements and add depth, which I absolutely adore for cardmaking. I’ve also found that glue dots are brilliant for attaching small embellishments like sequins or beads. The trick is to match your adhesive to your project. Don’t use a heavy-duty industrial glue for a delicate vellum overlay, and equally, don’t expect a tiny glue dot to hold a structural piece. Experiment with a few types to see what you prefer, but always ensure they are acid-free if you want your creations to last.
Adding That “Wow” Factor: Embellishments and Textures
This is where the magic truly happens, my friends! Once you’ve got your basic structure, adding embellishments and playing with textures can elevate your paper art from nice to absolutely stunning. It’s like adding the perfect accessories to an outfit – they complete the look and reflect your personal style. I get such a thrill from finding just the right ribbon, a tiny charm, or a unique piece of patterned paper that makes a project sing. It’s not about cluttering your piece with every shiny thing you own, but rather strategically placing elements that enhance the overall design and draw the eye. Think about the story you want your piece to tell and how these little additions can help narrate it. I once created a gift box using plain kraft paper, but by adding a beautiful lace ribbon and a tiny dried flower, it transformed into something truly elegant and special. It’s all about those thoughtful touches!
Elevating Surfaces: Textural Play
Texture adds so much interest and depth to paper projects. Don’t limit yourself to just smooth paper! Think about incorporating materials like corrugated cardstock, felt, fabric scraps, or even natural elements like dried leaves or small twigs. Embossing, both dry and heat embossing, is another fantastic way to add tactile appeal. Dry embossing creates raised designs using stencils and a stylus, while heat embossing uses powder and a heat tool for a glossy, raised effect that is just beautiful. I love how it makes text or images really pop off the page. Even simply layering different weights and finishes of paper can create subtle yet effective textural contrasts. For instance, pairing a smooth, matte cardstock with a metallic or glitter paper adds an instant touch of glam without being over the top. The sensation of touching a textured piece often makes it feel more luxurious and considered, and it’s something I always try to incorporate into my more special projects.
Sparkle and Shine: Embellishments That Pop
Embellishments are like the jewelry of paper crafting. They can be subtle or bold, but they always add that extra touch of personality. Ribbons, buttons, sequins, beads, charms, die-cut shapes, stickers, and even glitter are all wonderful ways to add flair. My advice here is to use them strategically. Don’t overcrowd your piece; sometimes less is truly more. Consider the overall theme and color scheme of your project. For example, if I’m making a vintage-themed card, I might opt for antique-bronze charms and sepia-toned lace. If it’s a bright, cheerful birthday card, colorful sequins and glitter are a must! I often keep a small stash of various embellishments sorted by color or type, so I can easily find just what I need. And remember, you don’t always have to buy expensive embellishments; sometimes, cutting out a small design from a patterned paper or using a unique button from an old shirt can be just as effective, if not more so, because it adds a personal, upcycled touch. It’s all about creativity!
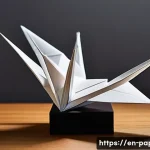
Bringing Paper to Life: Diving into 3D Wonders
If you’ve mostly stuck to flat cards or scrapbook pages, prepare to have your mind blown! Diving into 3D paper crafts is an incredibly rewarding experience. It’s like sculpture, but with the humble sheet of paper as your medium. From intricate pop-up cards that magically spring to life to beautifully folded origami creatures and stunning paper flower bouquets, the possibilities are truly endless. I remember the first time I successfully completed a complex paper lamp, and the feeling of accomplishment was just immense. It transforms your perception of what paper can do, moving it beyond a mere surface to a material with volume, form, and presence. This area of paper crafting definitely requires a bit more patience and precision, but the results are always worth the effort. It’s a fantastic way to create unique home décor, personalized gifts, or even elaborate party decorations that truly stand out.
Sculpting with Paper: Forms and Structures
When you start thinking about paper as a sculptural medium, a whole new world opens up. This involves techniques like scoring, folding, curling, and even wet-forming paper to create robust and interesting shapes. Origami is the classic example of pure paper sculpture, using only folds to create intricate figures. Kirigami, which combines cutting and folding, allows for even more complex structures like pop-up elements. For larger forms, like paper lampshades or decorative boxes, understanding how to create tabs for gluing and reinforcing edges is key. I’ve found that using heavier cardstock or even specialty art papers can greatly enhance the stability and longevity of your 3D creations. Don’t be afraid to experiment with how paper behaves; sometimes, a simple curl with your fingers can transform a flat strip into a dynamic, flowing element. It’s all about understanding tension and support within the paper itself. My advice is to start with simpler 3D projects and gradually work your way up to more complex designs.
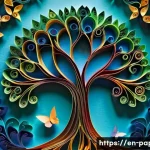
Layering Magic: Creating Depth and Dimension
Layering isn’t just for flat cards; it’s absolutely vital in 3D paper art for creating incredible depth and visual interest. By stacking different pieces of paper, using foam adhesives, or strategically placing elements, you can build up multiple planes within your creation. Think about how a landscape painting uses foreground, midground, and background to create an illusion of depth; you can do the same with paper. For example, in a shadow box, you might layer several die-cut scenes, each slightly offset, to create a deep, immersive diorama. Pop-up cards rely heavily on this principle, where elements pop forward at different distances from the base. Even simpler projects, like paper flowers, use multiple layers of petals to create a full, realistic bloom. I’ve found that playing with varying shades of the same color in different layers can also create a stunning ombré effect that adds a subtle sophistication to dimensional pieces. It’s truly amazing how a few well-placed layers can transform a simple arrangement into a captivating, multi-dimensional artwork.
| Paper Type | Best Uses | Key Characteristics |
|---|---|---|
| Cardstock (65-110lb) | Cardmaking, scrapbooking, 3D projects, die-cutting | Thick, sturdy, holds shape well, wide range of colors/finishes |
| Text-Weight Paper (20-40lb) | Origami, quilling, delicate cuts, layering, printing | Lighter, more pliable, easier to fold intricately, often translucent |
| Specialty Paper (Vellum, Glitter, Metallic) | Embellishments, accents, creating specific effects (translucency, sparkle) | Unique finishes, adds visual interest, varies greatly in weight/flexibility |
| Watercolor Paper | Mixed media, painting, adding texture before cutting | Absorbent, textured surface, holds water and pigment well, often thick |
Your Signature Style: Personalizing Every Piece
This is where your paper crafting truly becomes *yours*. It’s not just about following a tutorial; it’s about infusing your personality, your story, and your unique aesthetic into every fold and cut. I’ve found that the most satisfying projects are the ones where I can look at them and instantly recognize my own touch. It’s about more than just making something pretty; it’s about making something meaningful. Developing your signature style takes time and experimentation, but it’s such a fun journey of self-discovery. Don’t be afraid to break the rules or combine techniques in unexpected ways. The paper crafting community is incredibly supportive, and there’s no single “right” way to do things. What truly makes your art stand out is *you*. I remember making a series of personalized gifts for friends, and each one incorporated a little inside joke or a color scheme I knew they loved, and those were always the most cherished gifts.
Color Me Happy: Mastering Palettes
Color is such a powerful tool in paper crafting! It sets the mood, evokes emotion, and instantly grabs attention. Understanding basic color theory can really elevate your designs. Think about complementary colors (opposites on the color wheel) for high contrast and vibrancy, or analogous colors (next to each other on the color wheel) for a more harmonious, soothing feel. Monochromatic palettes, using different shades and tints of a single color, can be incredibly elegant and sophisticated. I personally adore playing with bright, cheerful colors for my cards, but I also love the serene beauty of a muted, earthy palette for home décor pieces. Don’t be afraid to step outside your comfort zone and try new combinations! Sometimes, just changing one color in a palette can completely transform the feeling of a piece. Pinterest and Instagram are fantastic places to find color inspiration, or even just looking at nature – the colors in a sunset or a field of flowers can spark amazing ideas.

Telling Your Story: Incorporating Personal Touches
What truly makes a handmade item special is the personal touch. This can be as simple as adding a handwritten note, incorporating a meaningful photograph, or choosing colors that remind you of a specific memory or person. Think about the recipient or the purpose of your piece. Is it a gift for a friend who loves cats? Find some cat-themed paper or die-cuts! Is it a piece for your own home? Reflect your personal style – whether that’s minimalist, bohemian, or brightly eclectic. I love to use little mementos like ticket stubs from a special event, a pressed flower from a walk, or even tiny quotes stamped onto a label. These small additions don’t just decorate; they tell a story and create a deeper connection with the piece. It’s these thoughtful details that move your paper art beyond just “craft” and into the realm of truly meaningful, cherished objects.
Showcasing Your Hard Work: Photography Tips for Crafters
You’ve poured your heart and soul into creating something beautiful, so why not show it off in the best possible light? Good photography isn’t just for professionals; it’s an essential skill for any crafter who wants to share their work, whether it’s on social media, a blog, or an online shop. I learned this the hard way when I first started my blog – my early photos were, well, *rough*. But with a few simple tricks, I saw a massive improvement in engagement and interest in my projects. You don’t need fancy equipment; your smartphone camera is perfectly capable. It’s all about understanding light, composition, and a few basic editing principles. Think of your photos as another extension of your art; they are the window through which others see your talent. A beautifully captured image can inspire others and help them appreciate the intricate details you’ve worked so hard on. It truly makes a difference in how your work is perceived.
Light It Up: Mastering Illumination
Good lighting is, hands down, the most important element in product photography. Natural light is your best friend! Find a spot near a window (but not in direct harsh sunlight) during the daytime. This provides soft, even illumination that shows off true colors and textures without harsh shadows. If you don’t have good natural light, investing in a small, inexpensive LED ring light or a couple of daylight-balanced lamps can make a huge difference. Avoid using your camera’s flash, as it often creates unflattering shadows and makes your paper look flat. I sometimes use a piece of white foam board opposite my window to bounce light back onto my project, filling in any shadows. Experiment with different times of day; morning or late afternoon light can often be softer and more golden, adding a beautiful warmth to your images. The goal is to illuminate your piece evenly so all the intricate details are clear and inviting.
Angles and Details: Capturing the Essence
Once you have your lighting sorted, it’s time to think about composition. Don’t just take one straight-on shot! Experiment with different angles. A flat lay (shot from directly above) is great for showing off cards or scrapbook pages. For 3D items, try a slightly elevated angle to show dimension, and also get some close-up detail shots. These close-ups are fantastic for showcasing intricate cuts, textures, or tiny embellishments that might be missed in a wider shot. Think about what makes your project unique and highlight that! I often use simple, uncluttered backgrounds – a plain white or light-colored surface works wonders – so that my paper art truly stands out. You can also add a few complementary props, like a small plant, a cup of tea, or other crafting tools, to create a lifestyle shot that makes your project feel more inviting and relatable. Just make sure the props don’t overpower your main piece. The goal is to tell a visual story about your creation.
Wrapping Things Up
Well, my fellow paper enthusiasts, we’ve covered quite a bit today, haven’t we? From the essential tools that make our lives easier to the thrilling world of 3D creations and how to truly personalize your art, I genuinely hope you’ve found some inspiration and practical takeaways to fuel your next project. This journey into paper crafting is incredibly personal and wonderfully rewarding. There’s nothing quite like the feeling of bringing a vision to life with your own hands, and seeing the joy it brings, whether to yourself or a loved one. Keep experimenting, keep creating, and most importantly, keep having fun!
Handy Tips You’ll Be Glad You Knew
Here are a few extra nuggets of wisdom I’ve picked up along the way that I think will make your crafting journey even smoother:
1. Don’t be afraid to repurpose! Old cereal boxes, gift wrap scraps, or even junk mail can become fantastic components in your projects. I’ve turned countless pieces of “trash” into treasure, and it feels great.
2. Keep your blades sharp. Seriously, a dull blade is a dangerous and frustrating blade. Change your craft knife blades regularly; your paper and your patience will thank you.
3. Invest in good quality adhesive. Nothing is more disheartening than your meticulously crafted project falling apart. Test different glues and tapes to find what works best for your specific needs, always looking for acid-free options.
4. Organize your supplies. A tidy workspace is a happy workspace, and it saves so much time. Simple clear bins or even shoeboxes can make a huge difference in knowing what you have and where to find it.
5. Share your work! Seriously, the crafting community is so supportive. Whether it’s on Instagram, a local craft group, or just with friends and family, sharing your creations is a wonderful way to connect, get feedback, and inspire others.
Key Takeaways for Your Crafting Journey
At the heart of it all, paper crafting is about creative expression and the joy of making. Remember that having the right tools, even just a few quality ones, makes a huge difference. Master fundamental techniques like precise cutting and scoring to elevate your work, and don’t shy away from adding personal embellishments and textures to make each piece uniquely yours. Exploring 3D forms can open up incredible new possibilities, and always remember to beautifully photograph your creations to share your passion with the world. Most importantly, embrace the process, learn from every project, and let your imagination lead the way.
Frequently Asked Questions (FAQ) 📖
Q: How do I even get started with paper crafting if I’m a total beginner and feel a little overwhelmed?
A: Oh, I totally get that feeling! When I first rediscovered paper crafting, I felt a bit like a kid in a candy store – so many beautiful papers and tools, but where do you even begin?
My best advice is to start super simple. You don’t need a fancy cutting machine or a ton of specialized tools right off the bat. Grab a good pair of sharp scissors, some basic craft glue (my go-to is a white PVA glue that dries clear), and a stack of colorful construction paper or cardstock.
Start with something like making simple greeting cards for friends and family. Learning to fold a perfect crease, making clean cuts, or even just assembling a few layers can be incredibly satisfying.
Or, try your hand at basic origami; there are tons of free tutorials online for things like paper cranes or simple boxes. The key is to just dive in with what you have and let your creativity lead the way.
You’ll quickly discover what you love and what tools might make your next project even more fun. It’s all about building confidence step by step, and trust me, the pure joy of creating something with your own hands is truly addictive!
Q: What are some current trends in paper art that I can try for home decor or unique gifts?
A: This is such a fun question because paper art is just exploding right now in the decor and gifting world! I’ve been seeing so many gorgeous trends that are surprisingly approachable.
One of my absolute favorites is creating stunning 3D paper flower arrangements. Think big, beautiful blooms that never wilt, perfect for a centerpiece or a gallery wall.
You can make them in any color palette to match your home, and they make such thoughtful, personalized gifts. Another huge trend is intricate paper-cut art or layered shadow boxes.
Imagine a delicate landscape or a personalized family tree, all crafted from layers of paper to create depth and shadow. These pieces really add a touch of sophistication and uniqueness to any space.
And let’s not forget the resurgence of quilling – those delicate paper scrolls can be transformed into amazing textural designs for wall art, jewelry, or even decorating gift tags.
What I love most about these trends is how eco-friendly and budget-friendly they can be; often, a few sheets of paper and a little patience are all you need to create something truly spectacular.
Q: How can paper crafting help me unwind and disconnect, especially after a busy week filled with screens and tasks?
A: Oh, this is where paper crafting truly shines for me! After a particularly hectic week, when my brain feels completely overloaded from staring at screens and juggling a million tasks, diving into a paper project is like hitting a reset button.
It’s incredibly mindful. When you’re focusing on a precise cut, carefully folding a piece of paper, or meticulously arranging tiny elements, your mind is entirely absorbed in the present moment.
There’s no room for worrying about your inbox or that endless to-do list. I’ve found that the tactile experience – the feel of different papers, the sound of scissors, the smell of fresh glue – engages senses that often get neglected in our digital lives.
Plus, there’s an immense sense of satisfaction and accomplishment that comes from holding a tangible, beautiful object you’ve created. It’s such a healthy way to disconnect, recharge your creative batteries, and feel a real sense of achievement that’s so different from ticking off a task list.
It’s less about the perfect outcome and more about the peaceful process, allowing you to just breathe and create.