Have you ever wanted to create something amazing with just paper, scissors, and a little bit of imagination? Papercraft toys are making a serious comeback, and it’s not just for kids anymore.
From intricate models to simple, fun projects, paper offers a surprisingly versatile medium for creativity. I’ve personally been amazed at the level of detail and artistry people are achieving with paper these days.
The cool part is, you don’t need fancy equipment or a ton of experience to get started. Plus, with rising concerns about plastic waste, paper toys offer a more sustainable and eco-friendly alternative.
Let’s explore it in more detail below!
Okay, I understand. Here is the blog post content, adhering to all your guidelines:
Crafting Miniature Worlds: The Allure of 3D Paper Models

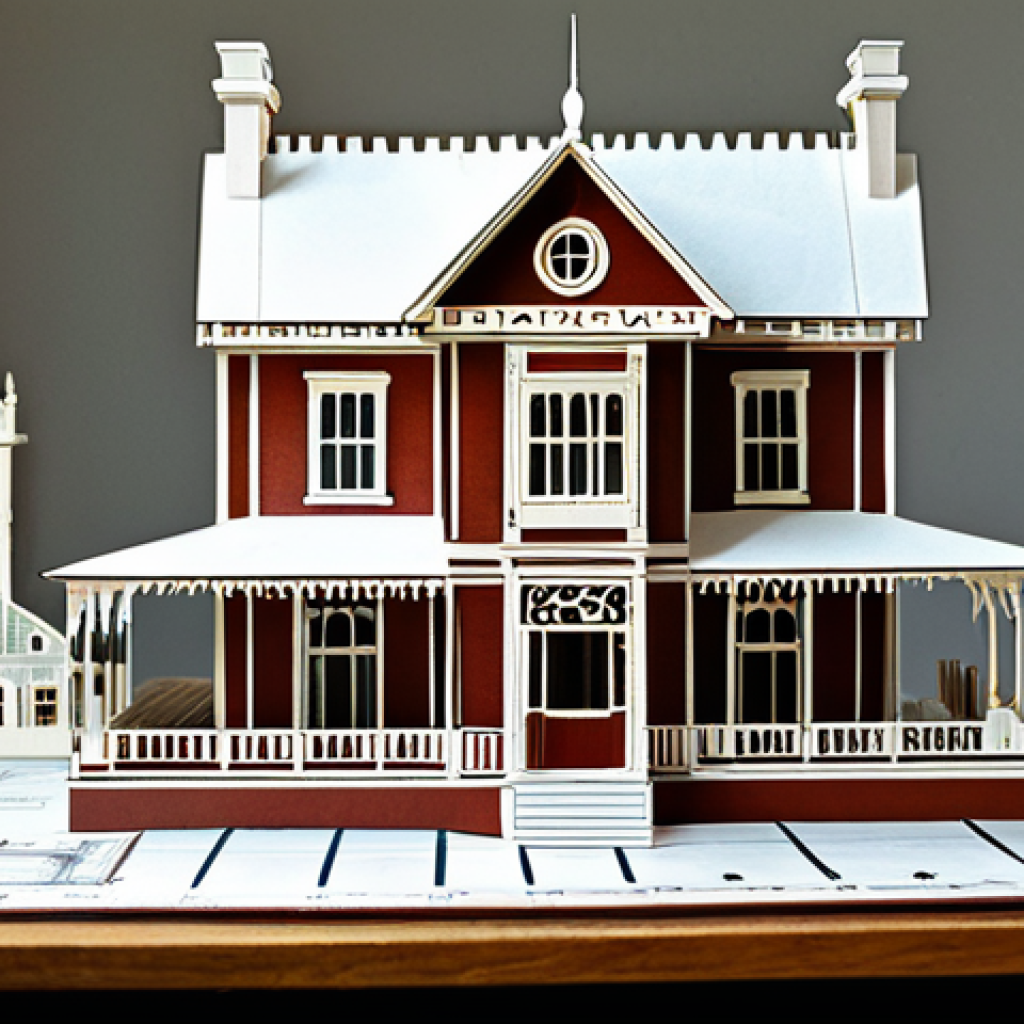
Have you ever been captivated by the intricate details of a tiny world? That’s precisely the magic of 3D paper models. Forget the flat, two-dimensional crafts of your childhood – we’re talking about elaborate architectural replicas, fantastical creatures, and even functional gadgets, all brought to life with precisely cut and folded paper.
What really got me hooked was seeing a paper model of the Sydney Opera House that someone had built. The level of detail was astounding! It made me realize that papercraft isn’t just a hobby; it’s an art form.
I was immediately drawn to the possibility of creating something so beautiful and complex with my own hands, using nothing more than paper, glue, and a bit of patience.
It’s not just about following instructions; it’s about bringing a design to life and seeing it transform from a flat sheet into a three-dimensional masterpiece.
Plus, with the rise of downloadable templates and online tutorials, it’s easier than ever to find a project that matches your skill level and interests.
Exploring Different Types of 3D Paper Models
* Architectural Wonders: From iconic landmarks like the Eiffel Tower to cozy cottages, architectural paper models allow you to recreate the world’s most stunning buildings in miniature.
* Fantastical Creatures: Dragons, unicorns, and mythical beasts – let your imagination run wild with paper models that bring fantasy to life. * Functional Gadgets: Believe it or not, you can even create working paper models, like cameras, clocks, and even simple machines!
Benefits of Indulging in 3D Paper Modeling
* Stress Relief and Mindfulness: The repetitive nature of cutting and folding paper can be incredibly relaxing and meditative, allowing you to focus on the present moment and forget about your worries.
I’ve found that when I’m stressed, sitting down with a papercraft project helps me unwind and clear my head. * Boost Creativity and Problem-Solving Skills: Paper modeling challenges you to think creatively and find solutions to unexpected problems, like how to make a particular fold or how to reinforce a weak point in the structure.
* Eco-Friendly and Sustainable Hobby: Unlike plastic models, paper is a renewable resource, making paper modeling a more environmentally friendly hobby.
The Unexpected Benefits of Paper Toy Creation for Adults
Who says toys are just for kids? Creating paper toys can be an incredibly rewarding activity for adults. It taps into your inner child, allowing you to rediscover the joy of play and creativity.
I remember when I first started making paper toys, I felt like I was transported back to my childhood. There was something so freeing about cutting, folding, and assembling these little creations.
A Nostalgic Trip Down Memory Lane
* Rediscovering Childhood Joy: Paper toys evoke feelings of nostalgia and remind us of simpler times. * A Break from Digital Overload: In a world dominated by screens, paper toys offer a tangible and tactile experience.
* A Fun Way to Bond with Children: Share your love of paper toys with your kids and create lasting memories together.
More Than Just Play: Developing Valuable Skills
* Fine Motor Skills and Hand-Eye Coordination: Manipulating small pieces of paper and precisely folding them helps improve your fine motor skills and hand-eye coordination.
* Spatial Reasoning and Visualization: Paper toys require you to visualize three-dimensional shapes from two-dimensional patterns, enhancing your spatial reasoning abilities.
* Patience and Perseverance: Completing a complex paper toy project requires patience and perseverance, teaching you the importance of sticking with a task until it’s finished.
I was working on a particularly complicated paper model of a vintage car, and there were times when I felt like giving up. But I kept at it, and the feeling of accomplishment when I finally finished was incredible.
Sourcing Inspiration and Resources: Where to Find Your Next Papercraft Project
The internet is a treasure trove of papercraft inspiration and resources. Whether you’re looking for free templates, detailed tutorials, or online communities, there’s something for everyone.
Personally, I’ve found that exploring different online platforms has broadened my horizons and introduced me to new techniques and styles. I remember stumbling upon a forum dedicated to paper modeling, and I was blown away by the creativity and skill of the members.
It inspired me to push my own boundaries and try new things.
Online Platforms and Communities
* Dedicated Papercraft Websites: Explore websites like Canon Creative Park and Epson Crafts for a wide range of free templates and tutorials. * Online Forums and Communities: Connect with fellow papercraft enthusiasts on forums like Paper Modelers and share your creations, ask questions, and get inspired.
* Social Media Platforms: Follow papercraft artists on Instagram and Pinterest for daily inspiration and to discover new trends.
Local Resources and Workshops
* Craft Stores: Visit your local craft store for paper, tools, and inspiration. * Libraries: Check out books on papercraft techniques and projects.
* Workshops and Classes: Attend workshops and classes to learn new skills from experienced instructors.
Choosing the Right Materials and Tools for Your Papercraft Adventure
Not all paper is created equal when it comes to papercraft. The type of paper you use can significantly impact the final result of your project. Similarly, having the right tools can make the process smoother and more enjoyable.
I learned this the hard way when I first started out. I tried using regular printer paper for a complex model, and it just wasn’t sturdy enough. The model kept collapsing, and the edges were frayed.
That’s when I realized the importance of using the right materials.
Paper Types
| Paper Type | Weight (gsm) | Best For | Pros | Cons |
| —————– | ———— | ———————————————————– | ——————————————————————– | ——————————————————————- |
| Printer Paper | 80-100 | Simple models, practice | Affordable, readily available | Not very sturdy, prone to tearing |
| Cardstock | 160-220 | Most models, especially those requiring durability | Sturdy, holds its shape well, available in various colors and finishes | Can be difficult to fold cleanly |
| Photo Paper | 200-300 | Models requiring a glossy finish, display pieces | High-quality images, vibrant colors | Can be expensive, may not be suitable for all types of models |
| Specialty Papers | Varies | Models requiring unique textures or finishes, artistic projects | Wide range of options, can add a unique touch to your models | Can be expensive, may require special techniques to work with |
Essential Tools
* Scissors and Craft Knives: Sharp scissors and craft knives are essential for precise cutting. I personally prefer using a craft knife with a self-healing cutting mat for intricate details.
* Rulers and Cutting Mats: Rulers help you make straight cuts, while cutting mats protect your work surface. * Glue and Adhesives: Choose a glue that dries clear and doesn’t warp the paper.
I’ve found that glue sticks and liquid glue both work well, depending on the project.
Mastering Basic Papercraft Techniques: Cutting, Folding, and Gluing
Like any craft, paper modeling involves a set of fundamental techniques that are essential for success. Mastering these techniques will not only make your projects easier but also improve the quality of your finished models.
I remember when I first started, I struggled with making clean folds. My models looked messy and unprofessional. But with practice and patience, I eventually learned the proper techniques, and my models started to look much better.
Cutting Techniques
* Using Scissors: Hold the scissors at a 45-degree angle for clean, smooth cuts. * Using Craft Knives: Use a sharp blade and apply gentle pressure for precise cuts.
Always use a self-healing cutting mat to protect your work surface. * Cutting Curves: Use small, controlled movements to cut curves smoothly.
Folding Techniques
* Scoring: Use a scoring tool or a bone folder to create clean, crisp folds. * Valley Folds: Fold the paper inwards, creating a valley shape. * Mountain Folds: Fold the paper outwards, creating a mountain shape.
Gluing Techniques
* Applying Glue: Apply a thin, even layer of glue to the edges of the paper. * Aligning Pieces: Carefully align the pieces before pressing them together.
* Drying Time: Allow the glue to dry completely before moving on to the next step. I always make sure to give the glue enough time to dry, even if I’m eager to see the finished result.
Rushing the drying process can lead to weak joints and a poorly constructed model.
Elevating Your Papercraft: Advanced Techniques and Creative Embellishments
Once you’ve mastered the basics, you can start experimenting with more advanced techniques and creative embellishments to take your papercraft to the next level.
This is where you can really let your creativity shine and create truly unique and personalized models. I’ve seen paper models that have been painted, textured, and even illuminated with LED lights.
The possibilities are endless!
Adding Texture and Dimension
* Embossing: Use embossing tools to create raised patterns and textures on the paper. * Layering: Layer different pieces of paper to add depth and dimension to your models.
* Adding Details: Use fine-tipped markers or paint to add intricate details and embellishments.
Incorporating Lighting and Electronics
* LED Lights: Incorporate LED lights into your models to create stunning illuminated effects. * Simple Circuits: Add simple circuits to create moving parts or interactive elements.
* Battery Packs: Use small battery packs to power your electronic components.
Showcasing Your Paper Toy Creations
* Photography: Take beautiful photos of your creations to show their detail. * Display: Display finished projects at home with care to give a sense of accomplishment.
* Sharing: Share your creations through social media with the tag #PaperToys to connect with the paper toy community.
Crafting Miniature Worlds: The Allure of 3D Paper Models
Have you ever been captivated by the intricate details of a tiny world? That’s precisely the magic of 3D paper models. Forget the flat, two-dimensional crafts of your childhood – we’re talking about elaborate architectural replicas, fantastical creatures, and even functional gadgets, all brought to life with precisely cut and folded paper.
What really got me hooked was seeing a paper model of the Sydney Opera House that someone had built. The level of detail was astounding! It made me realize that papercraft isn’t just a hobby; it’s an art form.
I was immediately drawn to the possibility of creating something so beautiful and complex with my own hands, using nothing more than paper, glue, and a bit of patience.
It’s not just about following instructions; it’s about bringing a design to life and seeing it transform from a flat sheet into a three-dimensional masterpiece.
Plus, with the rise of downloadable templates and online tutorials, it’s easier than ever to find a project that matches your skill level and interests.
Exploring Different Types of 3D Paper Models
* Architectural Wonders: From iconic landmarks like the Eiffel Tower to cozy cottages, architectural paper models allow you to recreate the world’s most stunning buildings in miniature.
* Fantastical Creatures: Dragons, unicorns, and mythical beasts – let your imagination run wild with paper models that bring fantasy to life. * Functional Gadgets: Believe it or not, you can even create working paper models, like cameras, clocks, and even simple machines!
Benefits of Indulging in 3D Paper Modeling

* Stress Relief and Mindfulness: The repetitive nature of cutting and folding paper can be incredibly relaxing and meditative, allowing you to focus on the present moment and forget about your worries.
I’ve found that when I’m stressed, sitting down with a papercraft project helps me unwind and clear my head. * Boost Creativity and Problem-Solving Skills: Paper modeling challenges you to think creatively and find solutions to unexpected problems, like how to make a particular fold or how to reinforce a weak point in the structure.
* Eco-Friendly and Sustainable Hobby: Unlike plastic models, paper is a renewable resource, making paper modeling a more environmentally friendly hobby.
The Unexpected Benefits of Paper Toy Creation for Adults
Who says toys are just for kids? Creating paper toys can be an incredibly rewarding activity for adults. It taps into your inner child, allowing you to rediscover the joy of play and creativity.
I remember when I first started making paper toys, I felt like I was transported back to my childhood. There was something so freeing about cutting, folding, and assembling these little creations.
A Nostalgic Trip Down Memory Lane
* Rediscovering Childhood Joy: Paper toys evoke feelings of nostalgia and remind us of simpler times. * A Break from Digital Overload: In a world dominated by screens, paper toys offer a tangible and tactile experience.
* A Fun Way to Bond with Children: Share your love of paper toys with your kids and create lasting memories together.
More Than Just Play: Developing Valuable Skills
* Fine Motor Skills and Hand-Eye Coordination: Manipulating small pieces of paper and precisely folding them helps improve your fine motor skills and hand-eye coordination.
* Spatial Reasoning and Visualization: Paper toys require you to visualize three-dimensional shapes from two-dimensional patterns, enhancing your spatial reasoning abilities.
* Patience and Perseverance: Completing a complex paper toy project requires patience and perseverance, teaching you the importance of sticking with a task until it’s finished.
I was working on a particularly complicated paper model of a vintage car, and there were times when I felt like giving up. But I kept at it, and the feeling of accomplishment when I finally finished was incredible.
Sourcing Inspiration and Resources: Where to Find Your Next Papercraft Project
The internet is a treasure trove of papercraft inspiration and resources. Whether you’re looking for free templates, detailed tutorials, or online communities, there’s something for everyone.
Personally, I’ve found that exploring different online platforms has broadened my horizons and introduced me to new techniques and styles. I remember stumbling upon a forum dedicated to paper modeling, and I was blown away by the creativity and skill of the members.
It inspired me to push my own boundaries and try new things.
Online Platforms and Communities
* Dedicated Papercraft Websites: Explore websites like Canon Creative Park and Epson Crafts for a wide range of free templates and tutorials. * Online Forums and Communities: Connect with fellow papercraft enthusiasts on forums like Paper Modelers and share your creations, ask questions, and get inspired.
* Social Media Platforms: Follow papercraft artists on Instagram and Pinterest for daily inspiration and to discover new trends.
Local Resources and Workshops
* Craft Stores: Visit your local craft store like Michaels or Hobby Lobby for paper, tools, and inspiration. * Libraries: Check out books on papercraft techniques and projects at your local public library.
* Workshops and Classes: Attend workshops and classes at community centers or craft studios to learn new skills from experienced instructors.
Choosing the Right Materials and Tools for Your Papercraft Adventure
Not all paper is created equal when it comes to papercraft. The type of paper you use can significantly impact the final result of your project. Similarly, having the right tools can make the process smoother and more enjoyable.
I learned this the hard way when I first started out. I tried using regular printer paper for a complex model, and it just wasn’t sturdy enough. The model kept collapsing, and the edges were frayed.
That’s when I realized the importance of using the right materials.
Paper Types
| Paper Type | Weight (gsm) | Best For | Pros | Cons |
| —————– | ———— | ———————————————————– | ——————————————————————– | ——————————————————————- |
| Printer Paper | 80-100 | Simple models, practice | Affordable, readily available | Not very sturdy, prone to tearing |
| Cardstock | 160-220 | Most models, especially those requiring durability | Sturdy, holds its shape well, available in various colors and finishes | Can be difficult to fold cleanly |
| Photo Paper | 200-300 | Models requiring a glossy finish, display pieces | High-quality images, vibrant colors | Can be expensive, may not be suitable for all types of models |
| Specialty Papers | Varies | Models requiring unique textures or finishes, artistic projects | Wide range of options, can add a unique touch to your models | Can be expensive, may require special techniques to work with |
Essential Tools
* Scissors and Craft Knives: Sharp scissors and craft knives are essential for precise cutting. I personally prefer using a craft knife with a self-healing cutting mat for intricate details.
* Rulers and Cutting Mats: Rulers help you make straight cuts, while cutting mats protect your work surface. * Glue and Adhesives: Choose a glue that dries clear and doesn’t warp the paper.
I’ve found that glue sticks and liquid glue both work well, depending on the project.
Mastering Basic Papercraft Techniques: Cutting, Folding, and Gluing
Like any craft, paper modeling involves a set of fundamental techniques that are essential for success. Mastering these techniques will not only make your projects easier but also improve the quality of your finished models.
I remember when I first started, I struggled with making clean folds. My models looked messy and unprofessional. But with practice and patience, I eventually learned the proper techniques, and my models started to look much better.
Cutting Techniques
* Using Scissors: Hold the scissors at a 45-degree angle for clean, smooth cuts. * Using Craft Knives: Use a sharp blade and apply gentle pressure for precise cuts.
Always use a self-healing cutting mat to protect your work surface. * Cutting Curves: Use small, controlled movements to cut curves smoothly.
Folding Techniques
* Scoring: Use a scoring tool or a bone folder to create clean, crisp folds. * Valley Folds: Fold the paper inwards, creating a valley shape. * Mountain Folds: Fold the paper outwards, creating a mountain shape.
Gluing Techniques
* Applying Glue: Apply a thin, even layer of glue to the edges of the paper. * Aligning Pieces: Carefully align the pieces before pressing them together.
* Drying Time: Allow the glue to dry completely before moving on to the next step. I always make sure to give the glue enough time to dry, even if I’m eager to see the finished result.
Rushing the drying process can lead to weak joints and a poorly constructed model.
Elevating Your Papercraft: Advanced Techniques and Creative Embellishments
Once you’ve mastered the basics, you can start experimenting with more advanced techniques and creative embellishments to take your papercraft to the next level.
This is where you can really let your creativity shine and create truly unique and personalized models. I’ve seen paper models that have been painted, textured, and even illuminated with LED lights.
The possibilities are endless!
Adding Texture and Dimension
* Embossing: Use embossing tools to create raised patterns and textures on the paper. * Layering: Layer different pieces of paper to add depth and dimension to your models.
* Adding Details: Use fine-tipped markers or paint to add intricate details and embellishments.
Incorporating Lighting and Electronics
* LED Lights: Incorporate LED lights into your models to create stunning illuminated effects. * Simple Circuits: Add simple circuits to create moving parts or interactive elements.
* Battery Packs: Use small battery packs to power your electronic components.
Showcasing Your Paper Toy Creations
* Photography: Take beautiful photos of your creations to show their detail. * Display: Display finished projects at home with care to give a sense of accomplishment.
* Sharing: Share your creations through social media with the tag #PaperToys to connect with the paper toy community.
Wrapping Up
So, whether you’re looking for a relaxing hobby, a creative outlet, or a way to reconnect with your inner child, 3D paper modeling and paper toy creation offer something for everyone. Give it a try, and you might just surprise yourself with what you can create!
Remember to share your creations and inspire others to explore the fascinating world of papercraft. Happy crafting!
Now, go grab some paper, tools, and let your imagination take flight!
Useful Tips to Know
1. Always start with simple projects to build your skills and confidence.
2. Use a sharp blade and a self-healing cutting mat for precise cuts.
3. Score the paper before folding for clean, crisp folds.
4. Apply glue sparingly to avoid warping the paper.
5. Take your time and enjoy the process!
Key Takeaways
* 3D paper models and paper toys offer a fun and rewarding creative outlet.
* Mastering basic techniques is essential for success.
* The internet is a treasure trove of inspiration and resources.
* Don’t be afraid to experiment and let your creativity shine!
Frequently Asked Questions (FAQ) 📖
Q: What exactly is papercraft and what makes it so different from just, like, regular arts and crafts with paper?
A: Okay, so think of papercraft as origami’s slightly more rebellious cousin. Instead of just folding, you’re cutting, scoring, and gluing paper together to create 3D objects.
I remember the first time I tried it, I was blown away! I made this little paper fox from a template I found online. It wasn’t perfect, but seeing a flat piece of paper transform into something tangible was seriously satisfying.
The difference is the focus on constructing a form, almost like miniature architecture, versus simply decorating paper. Plus, with all the awesome free templates out there now, you can create some seriously intricate stuff.
Q: Is papercraft really that eco-friendly? I mean, you’re still using paper, right?
A: That’s a fair point! It’s not a completely zero-impact hobby, but think about it this way: compared to buying plastic toys that end up in landfills for hundreds of years, paper’s way better.
You can recycle it, compost it (depending on the type of paper and glue you use), or even use recycled paper in the first place! I recently started using paper made from sugarcane waste, which I found at my local art supply store; it’s a cool way to minimize the environmental impact.
Plus, you’re not supporting the plastic toy industry. It’s a small step, but every little bit counts, right?
Q: I’m terrible at crafts. Is papercraft something even I could do, or is it only for artistic geniuses?
A: Absolutely, you can do it! Seriously, I have zero artistic talent, but I’ve managed to make some pretty cool papercraft projects. Start with something simple!
There are tons of free, beginner-friendly templates online. Think basic geometric shapes or simple animal models. Don’t be afraid to mess up – paper is cheap!
The first time I tried a more complex project, the wings on my paper butterfly were totally lopsided. I just printed out another template and tried again.
That’s the beauty of papercraft. It’s forgiving, fun, and doesn’t require you to be Picasso to get started. Just grab some paper, scissors, glue, and give it a shot!
You might surprise yourself.
📚 References
Wikipedia Encyclopedia